Pages

Why am I ECO FRIENDLY?

I have been conscious of the environment for many years, paying close attention to my CO2 contribution and garbage disposal.
I recycle and compost as much as I can, I use energy efficient bulbs and save water.
In the shop, all pure saw dust that is not contaminated, and small pieces of wood goes in the city compost bin. Cans, bottles, cardboard, paper and other are recycled. I give away local native plants to my clients when I have some extra. I use reclaimed materials as often as possible and encourage my friends and family to acknowledge they are part of this world and that we are all accountable. REMEMBER WE HAVE ONLY ABOUT TEN YEARS TO CHANGE OUR BEHAVIOR .

Front door restoration with Hydrotech Ply (veneer replacement)

The front door veneer was damaged by weather, a 1/8" veneer needed to be replaced. I used 1/8" Hydrotech ply. Used for boats and 6 coats of Spar Varnish known as Marine Coat.


This is a series of low quality recordings from the process. You can mute the video, sound is not very clear.


This are the stain and finish option I gave to the client:


Brad's Custom Bed Frame, San Francisco.


The dimensions were odd.

Legs are Solid Hard Maple, and rails are 1" Maple Plywood. The center metal bar and slats were bought at Ikea.

The client and me met at my place once and at my shop twice to agree in design and materials.
I built and deliver in 2 days.

He was very happy, because I did exactly what we designed and I charged by the hour.


<---Click in this image to see the drawings and planning of the bed frame!

Custom Gate, Albany.


I designed this Gate to be built with Afzelia (hardwood), and as you see, to be different than other gates... unique.

It ended up building it out of redwood (softwood), so I do not feel much appreciation for it, I can't help it. (it was supposed to be gorgeous!)
I'm good at building exactly what I design, all those years working in shops were worth the training!

Rescued Lumber Vanities

I love this project.
The client had remodeled her house. Wood from the old structure and framing was kept in the backyard covered with a tarp for quite a long time.
In the picture bellow there is some leftovers that show what was given to me to build this pieces.

The wood was cleaned and straightened to start building the face frames, panels, door frames, etc. Then after everything is assembled and squared the sanding and texturing of a 'semi rough and old' look can be worked out. The reason is that the joints have to be perfect to be strong so the wood needs to be straight, flat and squared.


After I built the pieces I started finishing with wax in 'cherry' first to give it a redish first coat.


Then a second dark and more 'artistic' coat to 'age' the pieces using fading techniques.


One of the challenges of this job was to do the panels with uneven wood, but it totally worked with patience and good biscuit location. Tight and no gaps.

The picture bellow is the 'sample' to imitate. Of course the wood is totally different so the grain will never let me perfectly stain it like that, MINE IT'S MADE OUT OF OLD STUDS!!


Dining Set Restoration


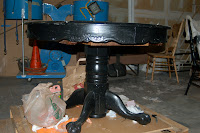
Removing black paint to refinish.
This pieces were originally varnished clear, later some kind of grey primer or paint and a 3rd and last coat of acrylic glossy black paint. This last coat was in very bad shape and everything will stick to it, so the owner called me to build her a new set. The truth is that when I saw this solid oak "old american" style I couldn't just be 'ok' with replacing it. We had to rescue it.


Using dental tools and good patience we have removed the residue from all the carvings and odd shapes, the chairs have been power washed with water after sitting for few hours in biodegradable stripping chemicals.


Then later using the powerful water based polyurethane black "break trough" I sprayed 3 thick coats, and a last thin and soft final coat to give it a smooth and even finish, durable and dark as it could be.
They wanted to see the grain anyways, so for that matter I took advantage of the density difference and porosity of oak. Using a power washer to clean the residue from the stripper, I accentuated the porosity of the softer grain, keeping it like that while sanding to allow the finish to show it because of its nature... difficult to explain but visually perfect.


The end of the story is that the clients were very happy with their dining set, he told me that this set it's been with him for about 20 years, and it will be more. Finally they offered me a delicious dinner, so I had the honor of sitting in this table and have the first meal after the restoration.

Hardowood floors, Window install, crown molding, belly band and misc repairs.

In this house a lot of things had to be redone or replaced. We started with the gutters, I changed all of them while raining( a no-no), but it had to be done. Then we did some deck boards replace, sheet-rock, I installed all the 3/4" pre-finished hardwood floor, baseboards, crown molding, and belly band. Then we replace the windows for some "home depot" windows, and finally we installed the tiles in the kitchen.

Some cabinet modifications in the kitchen also.

Awning in a bathroom.


Bathrooms require good ventilation for moist. This custom awning replaced an ugly vinyl double hung that didn't quite open. Obscure glass in the bottom and clear in the top. Clients are very happy about it.

Triple casement


Originally there was aluminum windows, now custom french triple casements. The wood is
VG FIR with insulated glass (double panel), roman ogee to match original windows.

They are weather proofed to be air tight.
This picture in the right shows their existing windows that were weather proofed also.


Triple casement w/divisions, and other misc. repairs.


This was three fixed windows, the two sides were replaced for new sashes, and the middle one only glass replaced. All the glass is laminated for security. Wooden glazing stops instead of glazing compound to avoid new leaks.  The water damage in the wall was also repaired. In this project, I forgot to bring my camera for the original damaged stuff. The client is happy with my work and other windows in the house will be replaced soon. Better pictures will be posted later.  

Other trim repairs were made to this door opening few days later, the client patched the wall and I repaired the door casing. Team work!


Custom gate, San Rafael.


This gate was made in two days worth of labor, plus materials. The clients are satisfied and happy, as well as me. Click in the picture to enlarge.

In-swing french casement and fixed curved top


Double tricky jobs: pine fixed double curved top and V.G. fir french casement IN-SWING, a total challenge to weatherproof. Made for Sinan's windows in 2008.


To the rigth is the stain grade side for the interior. Notice the bevel in the upper outside of the casement. And me cutting curved glazing stops with a jig in the tablesaw.


To the left, a close up of the exterior of the casements. And a close up of that tricky curve, before glazing it.